Spinning on a drop spindle that wobbles can be annoying for the spinner. The wobble, and resulting imbalance, may well be due to the spindle hook not being aligned properly. What follows is a quick 2 step method for checking and aligning you spindle hook. Each step represents a plane of alignment. ROUND NOSE PLIERS ARE THE PREFERRED TOOLS FOR ADJUSTING THE HOOK.
Step 1
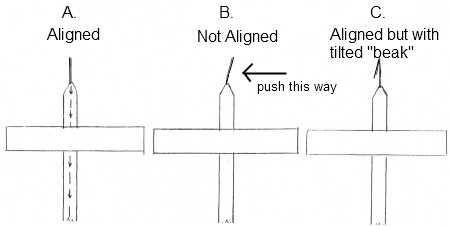
Look at the rear of your spindle hook. If the hook is properly aligned all you should see is a straight line that is continuous with the shaft, as shown by the first spindle (Figure 1A). If there is not a straight line you can adjust the hook by pushing it sideways left or right with you fingers (Figure 1B). If need be, use needle nose pliers with a soft cloth so as not to mar the metal. Although not as critical, you may at this point check to see if the “beak” is tilted and need straightening (Figure 1C). All you should see is a straight line.
Step 2
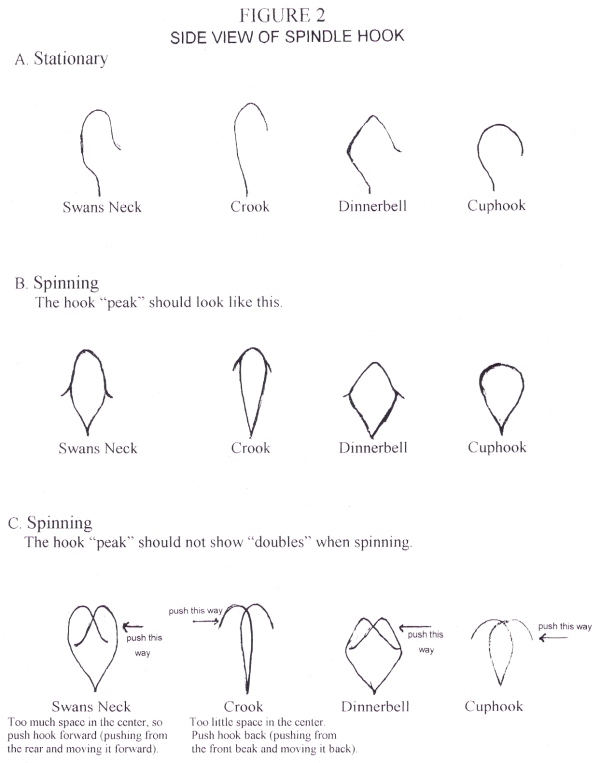
To complete the process of alignment you must next observe the hook while it is spinning. In Figure 2 you will see 4 common hook shapes and corresponding diagrams of what they should look like while spinning.
Attach some fiber and spin the tool as swiftly as you can. “Gaze” at the hook while it is spinning. If properly aligned the hook should look like one of those in Figure 2B. If, as in Figure 2C, you see “doubles” the hook is improperly aligned and it will need further adjustment (even though you have straightened it in step 1). To adjust, hold the spindle so you see the hook profile as in Figure 2A. Using your fingers again, (or needle nose pliers with a soft cloth), push the hook forward or back as described in figure 2C. Spin your spindle again, “gaze” at the hook, and recheck to see that the hook “peak” is uniform in appearance (you do not want to see “doubles”).
Figure 1 Rear View Of Spindle Hook

Figure 2 Side View of Spindle Hook

